TruScient® consists of recombinant human bone morphogenetic protein-2 (rhBMP-2), applied to the fracture site in an absorbable collagen sponge (ACS). The procedure involves reconstituting the rhBMP-2 solution, using this to prepare the sponges and then implanting the sponges into the fracture site.1
HOW TO USE TRUSCIENT®
Operating room poster detailing the steps involved in using TruScient®
A. Reconstituting rhBMP-2 (non-sterile field)
- Disinfect with alcohol the stoppers of the lyophilisate and the solvent vials
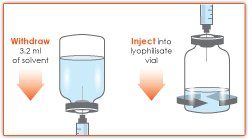
- Using the 6 mL syringe and needle, withdraw 3.2 mL of solvent
- Slowly inject the solvent into the lyophilisate vial to achieve a 0.2 mg/mL solution of rhBMP-2
- Swirl the vial gently to aid reconstitution; do not shake
- Discard the syringe and needle after use

TIP: More solvent is supplied than needed - do not use more than 3.2 mL.
B. Preparing TruScient® sponges (sterile field)
- Using sterile technique, transfer the two 3 mL syringes with needles and the sponges inner package into a tray in the sterile field
- Peel open the inner package of sponges and leave them in the tray
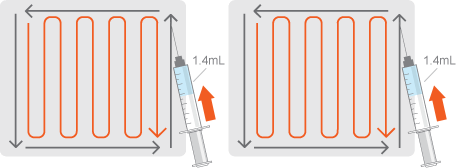
- Using aseptic transfer technique, with each 3 mL syringe and needle, withdraw 1.4 mL from the reconstituted vial of rhBMP-2 in the non-sterile field
- Leaving the sponges in the tray, uniformly distribute onto each sponge 1.4 mL rhBMP-2 solution as shown in the diagram

- Wait a MINIMUM of 15 minutes (maximum 2 hours) before using the prepared sponges
TIP: Keep the vial of reconstituted rhBMP-2 solution in the non-sterile field.
C. Implanting prepared sponges
- Identify the amount of prepared sponge needed to cover the fracture site - if only a portion of a sponge is required, first prepare the entire package, then cut or fold the prepared sponge as needed prior to implantation
- Achieve definitive fracture reduction, fixation and haemostasis prior to placement of the prepared sponge, and dry the fracture site to the extent possible
- Place the prepared sponge so that it bridges the fracture and makes good contact with the major proximal and distal fracture fragments - the sponge may be wrapped around the bone or placed up to the edges of a bone plate as the geometry of the fracture and fixation requires
Area vascularity should be maintained
Note that TruScient® will not provide mechanical stability and should not be used to fill spaces in the presence of compressive forces.
TIP: The amount of prepared sponge needed depends on the fracture anatomy and the ability to close the wound with minimal compression of the sponge. Use only the amount needed to achieve coverage of accessible fracture lines and defects (between <1 and 2 sponges).
TIP: Use forceps to handle the prepared sponge to avoid excessive fluid loss. Do not squeeze.
TIP: Do not cover bone plates with the sponge, in order to facilitate plate removal if needed following fracture healing.
D. Closing the surgical site
- Following placement, achieve complete soft-tissue coverage of the prepared sponges
- If a surgical drain is required, place the drain at least one layer superficial to or remote from the prepared sponge
TIP: Do not irrigate the wound once the sponge is placed across the fracture. Irrigation will wash away the rhBMP-2 solution.